Boxnotes User Guide
For Version 3.1This guide will help you use the Boxnotes software to find dimensions for your speaker enclosure
This page describes the controls and features, and their grouping into functional areas. The next page has a worked example containing illustrated step-by-step instructions on optimising an enclosure.
Items shown in Brown indicate fields that accept user input
Items shown in Green Italic indicate results displayed by Boxnotes
When entering data in metric mode, validation and recalculation occurs as you type.
When entering imperial data, you need to indicate when you have completed the field. As you type, the foreground color of the field changes to red, indicating that the data has not yet been validated.
Pressing "enter" or clicking on another field validates the data. If the format is correct, the foreground color is changed back to black and resonances calculated, otherwiswe an error message is presented.
Menu entries
Project - contains several submenus:
- Open - Loads a previously saved boxnotes project
- Save As - Saves boxnotes project. Provided boxnotes is able to create an ini file in the same folder as the program is located, it will also remember your preferences. You can store your actual projects in any folder.
- Notes - Opens a screen allowing you to add up to 8 single lines of text to be saved with your project. When a project contains notes, a small graphic appears on the top right hand corner of the main screen as a reminder. Clicking on the graphic will open the notes screen
- Generate Report - Exports your choice of data to a file in txt format, allowing easy printing or cutting and pasting into other applications. The report is written to file "report.txt" in the same folder as the program is located.
Cutting List - displays a new form containing the cutting list for all the panels required for your box.
There is a "Print" button on the form that simply produces a screenprint.
To print a list of dimensions for construction use, the report form has more choices.
Port Flanges - allows you to select if the port is flanged at one or both ends. This affects the calculation for tuning frequency. The end correction values are the same as used by WinISD: Neither end flanged k = 0.614 , one end flanged k = 0.732 , both ends flanged k = 0.85. When calculating the tuning frequency, the speed of sound is taken to be 344 m/sec.
Graphing Options - allows you to change how the resonances appear in the Spectral display and Resonance display
Units - Allows selection of metric or Imperial units. When working with Imperial units, you can use feet, inches and fractional inches down to 1/16" accuracy. Decimal inches can also be used. When working in metric, you can choose between mm and cm.
Print - Prints the form, less the border and title bar.
Help - contains several submenus:
- Show me where to measure - shows a graphic of where to measure the various dimensions
- About - gives access to links for e-mail, the boxnotes download page, and site homepage
The main screen

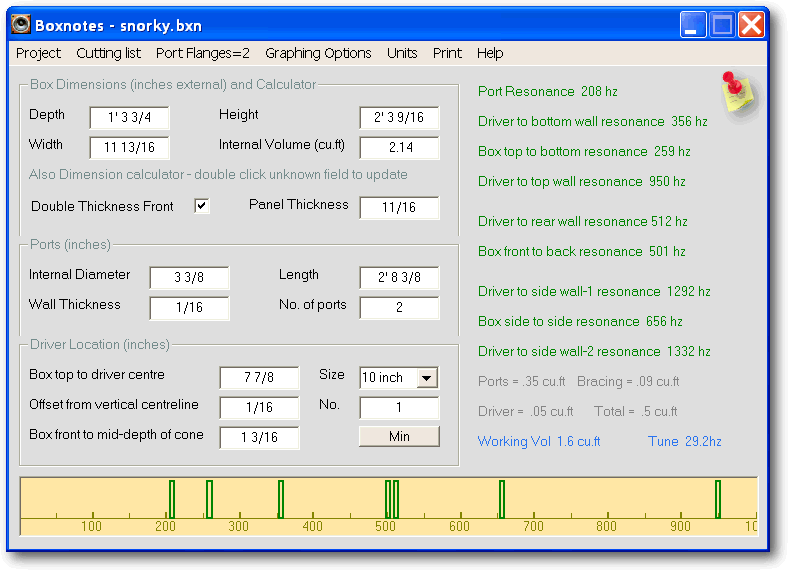
The screen is divided into six functional areas...

Box dimensions and calculator
This panel has four main fields to allow you to enter the external dimensions,
and is also a calculator
Specify any three values and then double-click on the fourth field to have its new value displayed.

The Internal volume in this section is for an empty box, without driver, ports or bracing
- these are taken into account further down the page with the display of the
Working Volume in the Tuning Summary.
It does take into account panel thickness.
The easiest usage is to enter your required volume and two dimensions,
then get boxnotes to calculate the missing dimension
The software will recalculate all the resonances and working volumes each time the value changes in one of these fields,
allowing you to instantly see the effect of your choice.
To help you to remember to double-click one of the other fields after you have changed a value,
there is a color cue
Here's how it works:
When you change any of the four fields, its background color changes to a light red.
Driver details
Location details entered here allow the software to locate the acoustic centre for the driver(s).
Selecting the driver size allows an estimate of how much volume it will occupy,
based on these average of values found on the Internet:
8 inch driver - 1 litre, 10 inch driver - 1.5 litres, 12 inch driver - 2.5 litres,
15 inch driver - 4 litres, 18 inch driver - 6.5litres
The Box front to mid-depth of driver cone value is automatically
estimated when changing driver size. (This is used in the calculation of the
Driver to back wall resonance)
If you wish, you can change the value after selecting your driver size.
The Driver offset value allows calculation of the
Driver to side wall resonances.
Moving the driver sideways by even a small amount can stop these resonances from reinforcing
the box side to side resonance. For subwoofers, you can normally leave this set to zero.
The Min button displays a new form containing the minimum box dimensions to hold your current driver.
After selecting the layout for your driver(s), you can transfer the minimum dimensions back
to the main form in order to begin prototyping your box.
Port details
When entering the value for Port length,
remember that when calculating Working Volume,
Boxnotes only cares about the segment of the port that is internal to the box.
When calculating Tuning Frequency, the full length of the port needs to be entered
Here are some possibilities for finding the correct Working Volume
- Port fully internal - Set Port length
to actual length of port. This is the value you would get if you put a tape measure into the port and read off
the distance from the inside end of the port to the outside of the box
Boxnotes automatically deducts the portion of the port that is within the thickness of the front panel, as this doesn't affect working volume - Ports completely external to box - Set Number of ports = 0 and boxnotes will not factor them in at all
- Port partially inside and partially outside - Ignore the length that is outside the box. Set Port length equal to the amount that is within the box. For example if total length was 800mm and you had 500mm external, you would set it to 300mm
Ticking the Double thickness Font field effects Internal volume, Port volume, Front to Back resonance, Driver to Back resonance and cutting list details
Resonances Display
Display area for the resonances calculated by the software. Problem resonances are highlighted in red
if Display resonances under 200hz
is selected in the Graphing Options menu.
They are grouped by which change of dimension affects them
Port resonance. Based purely on port length.
This is one of the hard limits to ported subwoofer design. As you increase port diameter and / or number of ports,
the increase in length brings this resonance down towards the working range of your sub.
If you are using a design package such as WinISD pro, you will already be aware of this value.
Driver to Top, Box Top to bottom, and Driver to Bottom resonances.
These resonances are based on the height of your box and the driver height.
Any subwoofer taller than around 1 metre will start to be impacted by this value.
Don't place your driver exactly half way up the box because then all three resonances will line up - move by 100mm
if possible
Driver to rear wall , Box front to back resonances.
The Driver to rear wall resonance is one that may cause problems if the box is overly deep.
For example, this will be around 320hz for a 600mm deep box.
The three Side to side resonances.
These aren't a problem for most subs which generally are a little larger than the driver.
Even for an 18 inch driver, the typical width would be around 500mm with a res. of around 370hz
Tuning Summary
This area shows the Working Volume for your box and the
Tuning frequency
The Working Volume is the Internal volume from the
Dimensions panel minus the additional volumes. In other words, Boxnotes deducts the port volume,
bracing volume and driver volume from the internal volume of the box to get the Working volume
This is the volume that needs to be the same as your design software has specified.
You may need to go back up to the Internal volume field and increase its value in order
to get your working volume to be what you need.

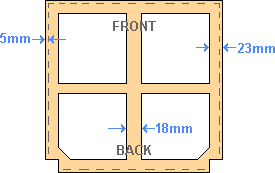
Shelf brace
The bracing calculation is based on the assumption that you use edge bracing made of strips cut
from the same material as the box sides.
It also factors in one shelf brace with material removed, leaving a square section perimeter and cross through the centre.
The Tuning Frequency is based on the Working Volume and the current port parameters
Quick Tip
A handy use for the Working Volume and Tuning Frequency summary is to dial in the port tuningOften the size of your box is limited by external factors. For example you may want the same height as existing speakers, have a limited depth available and want the box to be as narrow as possible. This will dictate a particular external volume. If you have settled on a particular tuning frequency, you can use Boxnotes to get the correct port length.
Enter your external dimensions and other fixed conditions , and then start changing the port length.
As you adjust the port length, boxnotes automatically factors in the new the port volume to display the working volume tuning and frequency
Spectral Display

This area gives a visual indication of the resonances listed in the Resonance Display.
Ideally no two resonances should coincide.
As you change the dimensions of your box, this display changes making it a lot easier to analyse than scanning down
the list of results in the Resonances Display.
The results are drawn as blocks rather than lines to remind you that resonances occur over a range of frequencies.
There is no meaning in the height of the plot, although when frequencies coincide,
the extra plots are made shorter and wider so you can still see them - as demonstrated in the above graphic at 650hz.
Once you have identified resonances which may be a problem, have a look at the
Damping Treatments page for some tips on how to minimise their impact.
Boxnotes worked example
Modelling in WinISD, it takes two 6inch ports to get the airspeed down to an acceptable level when driven with 800w
The ports will be entered as 152mm diameter, 4mm wall thickness and length of 1392mm
Enter Panel, driver and port details
Check that Panel thickness is set to 19mm ....and.... that
Double thickness Front is ticked
Use the Dropdown list to select a driver Size of 18 inch
Set Port length field to 1392 ....and.... Set
Internal diameter field to 152
Set Port wall thickness field to 4 ....and.... Set
Number of Ports field to 2
From the menu choose Port Flanges and select One End Flanged
Enter volume
Enter 200 into the Internal Volume field.
The field background turns light red to indicate that it has been changed and that the box dimensions
have not yet been recalculated
Double click on the Box depth field to calculate initial dimensions
Looking at the Tuning Summary, we see that the
Working volume is about 134 litres, which is about 66 litres short of what we want
Go back to the Internal volume field and add this amount - change it to 267 litres
and double click on Box depth field to recalculate dimensions
We now see that the Working volume is close enough to our target of 200 litres
Set minimum dimensions
Click the Min button to bring up the Minimum Dimensions screen.
This screen inherits the driver diameter and box panel thickness from the main screen.
Click the graphic that corresponds with the driver arrangement. In this case the 1st graphic is the one which shows 1 driver.
This tells us that to fit our driver, the minimum box width and minimum height is 470mm.
Click the Transfer button to copy the minimum width and height values onto the main screen.
Click the OK button to return to the main screen.
Double click the Box depth field to calculate its value, producing a value of 1387mm
Adjust box dimensions and examine resonances
We now have all the parameters entered and have a working box, albeit badly dimensioned.
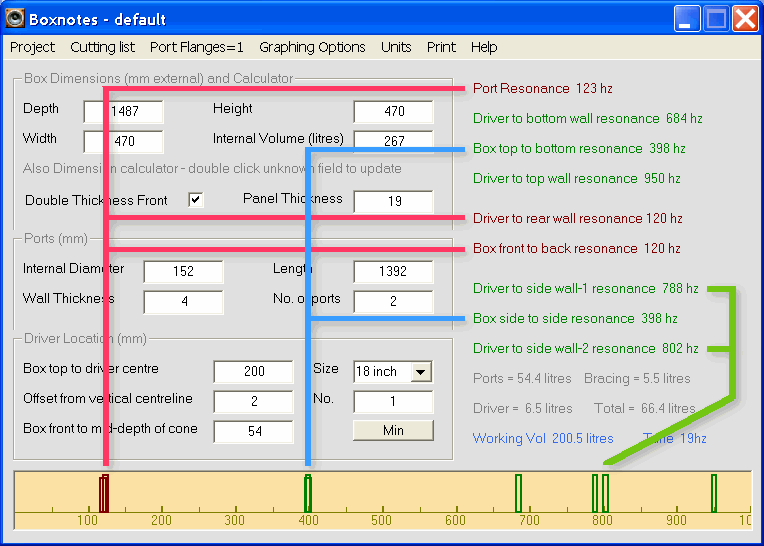
Looking at the Spectral Display, we see three problem areas ...

The red lines show that the front-to-back resonances are reinforcing the port resonance
The blue lines show that the top-to-bottom resonance is reinforcing the
side-to-side resonance.
Not surprising since the dimensions are the same
The green lines show that the driver-to-side wall resonances are reinforcing each other.
This can be addressed by moving the driver sideways.
Lets get that one out of the way first....
To make some room, increase the box width from 470 to 500mm.
Double-click the Box Depth field to recalculate the dimensions
Change the Offset from vertical centreline to 10mm.
Our spectral display now look like...

Lets see how a box height of 1000mm looks.
Enter 1000 into the Box height field and double-click the
Box Depth field to recalculate the dimensions
The new Box Depth comes in at 657mm, and the display looks like....

Now a standard size of MDF sheet is 600mm, so reduce the box depth to 600 + 19mm (thickness of front panel)
Enter 619 into the Box depth field and double-click the
Box Height field to recalculate the dimensions
This pushes the height out to 1066mm

The box top-to-bottom resonance is 167hz.
It would be nice to get this a bit higher, so lets make the box a bit wider
Change the Box width field to 531 and double-click the
Box Height field to recalculate the dimensions
The height is now 1000 and the top-to-bottom resonance has lifted to 178hz.

The driver is still sitting at the default 200mm down from the top.
This is giving a driver-to-bottom-wall resonance of 220hz.
Lets move it to the centre of the box and see what happens.
Change the Box top to driver centre field to 500mm...

We now have a cluster of resonances around 350hz. with the driver exactly half way up the box, the
driver-to-top-wall and
driver-to-bottom-wall resonances reinforce.
To make matters worse, they coincide with the box
side-to-side resonance.
Lets move the driver up a bit further..
Change the Box top to driver centre field to 400mm...

Now its crowded around 300hz...
Change the Box top to driver centre field to 300mm...

Much better with the resonances are all spaced out.
The exception is the pair around 300hz. This is the driver-to-back-wall and the
box-front-to-back combination,
which you cant do anything about.
It would be nice to have the
Box-top-to-bottom resonance a bit higher than 178hz, but dropping the height of the box would
mean making it deeper or wider. This would move the resonances around in the 300hz area,
which we have just managed to space out nicely, so this is probably about as good as can be done
Note that the ports are too long to fit into this box without several bends. That's a whole other issue though....
If you find Boxnotes useful, you might like to share the love
