Snorky
This subwoofer was in search of a name until I realised that the internal ports were bent into the shape of a snorkel
- thus "snorky" was born. This sub is the one designed on the WinISD case-study
page and was built for a friend. The goal was to produce a conventional looking sub that was not too big.
The folded ports, which are detailed on the gallery page are longer than the box is tall.
The level of finish is the best yet, mainly as a result of using glue and clamp construction.
Screws are only required to hold panels while glue dries. Leaving them out sacrifices no strength and gives a much cleaner box
The new owner has taken delivery of this speaker and by first accounts seems quite happy with it.
- Single 10 inch Jaycar CS-2274 Driver
- 80W Jaycar AMP
- 50 Litre 1.8 cu.ft enclosure - 27kg - 59lb
- 700H * 300W * 400D
- Tuning Frequency 28 Hz
- Two 86mm internal ports
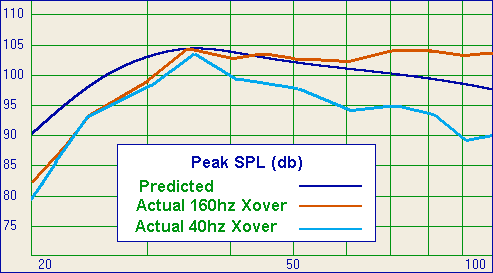
- WinISD Calculated Peak Output 105 dB
- Measured Avg Output (Complex Sound) before distortion 100db
- Estimated cost $480 Aud
The 80W amplifier has 4dB boost @ 35hz which negates the need for a hi-pass filter

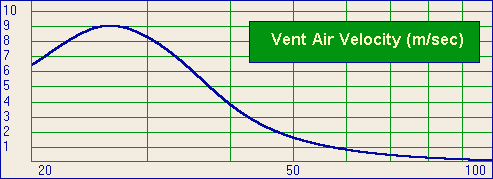
Two 86mm ports keep velocity below 10 m/sec

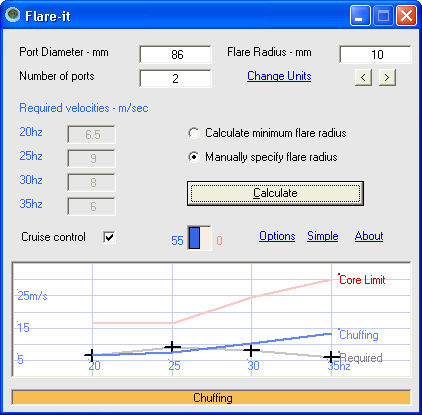
Both ends of the ports were flared by 10mm using a rollover bit in the router.
This Flare-it screenshot shows that this is just about good enough.

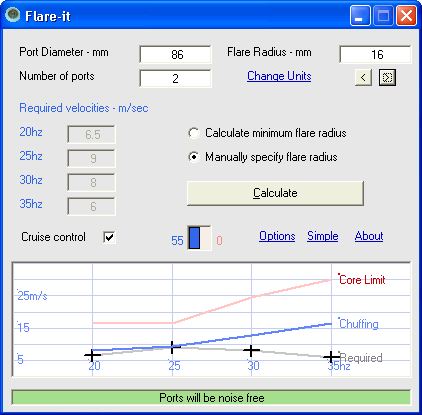
Moving to 16mm flares would have been icing on the cake. In practice, these would be 20mm heat molded, or if you have a full full sized router, 19mm routed flares

Cone excursion is fine

Snorky Subwoofer Gallery
Ready for finish
Sanded, ready for polyurethane finish. The port rollovers turned out particularly well. The proximity of the ports to the back of the driver can be seen
Ports
Top view of ports. Front panel is double thickness, with the inner panel fitting inside the box. The shelf brace supports the ports.
Side view
The top join in the PVC pipe had to be shortened before gluing to get it all to fit in the available box depth. Note the cutouts on the shelf bracing to clear the vertical edge bracing at the back of the box
Front panel
Front view of port assembly. Ports are let into panel to a depth just over half the thickness. This lets the PVC pipe bridge the join between the two layers of the front panel, meaning no visible seam
Another view of port folding
Bottom view from another angle. If building this sub again, the intakes would be flared
Carcass
Carcass showing foam top and bottom, and rebate for shelf brace. Notice that on the sides, the slot for the shelf brace stops short of the edge bracing on the rear panel.
Shelf braces slides in
Port assembly slid into place to show how shelf brace is integral to design. The sides and back of the box have a 5mm rebate to accept the shelf brace
Top view
Top view of completed Snory sub showing flush mounted driver, port rollovers and grille clips
Rear view
Panel layout and view of plate amp let into the box. A 45 degree edge around the amp tidies up the finish
Comparison
Photo showing relative sizes. Thats Snorky sitting on top of the Blast Furnace
